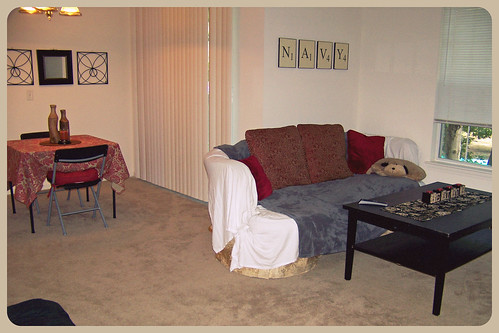
Hello all! I went to Charleston again the weekend after my birthday and this time, I got to decorate Jon's apartment!!! No more all beige and white! Of course, I couldn't spend too much money and you're never really SUPPOSED to do all the decorating all at once. At least, I don't think you are. It's something that's supposed to grow with you overtime. But, I did as much as I could.
You can't really see him, but Arthur (Jon's new kitten) is sitting in the chair. He approves of the cushions.
The table is actually one of the card tables from Target. The chairs were only $10 a piece. The wall art was $5 each and the mirror was on clearance.
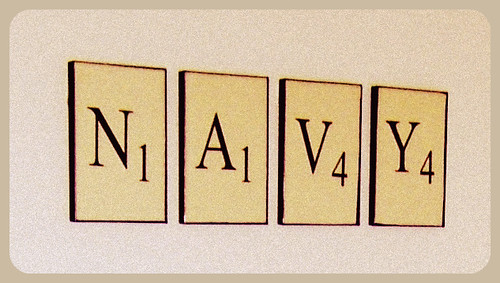
Now, Jon's couch, was a freebie haha. He can afford a new one, but this one's pretty comfy, so why bother? It's not in the greatest shape so Jon put the sheets on it. I then got the blanket at Tuesday Morning and the pillows were a freebie from our storage room that we're turning into my craft room :). The coffee table was a yard sale find by my mom and myself :). It's IKEA and we only paid $10 for it. The candles and place mats (which I made to look somewhat like a runner) were on clearance at Tuesday Morning. The NAVY scrabble tiles were made by me for a total of probably around $8. And I was asked to do a tutorial for the scrabble tiles, so, here it goes!
Scrabble Tile Wall Art Tutorial
Materials Needed
*8 1/2 x 11 Yellow Paper (or light brownish)*
*8 x 10 Black Picture Frames (I used the frames that were around $1.50 at Target)*
*Some Type of Word Processing Software (I used Microsoft Word 2010)*
*Printer*
Microsoft Word (2010) Instructions
Also applicable to Microsoft Word 2007
If you use another type of word processing software, these instructions probably won't apply.
1. Open Word to a new blank document
2. Next type the letter and the corresponding point value you wish to type. Highlight the selection and make the font Times New Roman (or if you wish, another font) and change the font size to 400
3. To enter the number properly, you will want to make it in subscript. To do this click the below button.
4. Once you have everything typed in, you will want to make sure your document is completely centered vertically and horizontally. To center your document horizontally, simply click the button below.
5. To center the document vertically, first select the "Page Layout" tab.
6. In the "Page Layout" tab go to the "Page Setup" section and select the square in the bottom right corner of that section.
7. Once you have clicked the square, it will open the "Page Setup" dialogue box. Once the box has been opened, select the "Layout" tab.
8. In the "Vertical Alignment" drop down menu select "Center".
9. Once you have changed the Vertical Alignment, select "OK", which will close the dialogue box. Make sure you have put the yellow paper in the printer and print the letter. Do this for each letter (once you have everything setup all you will need to change is the letter and number).
10. Since the paper is 8 1/2 x 11, you will need to trim the excess paper evenly on all sides. I placed the glass from the frame on top of the letter and trimmed it that way.
11. Once you have finished trimming the sides you simply place the sheet of paper in the frame and hang accordingly!


No comments:
Post a Comment